

If your trash can fills with peels, coffee grounds, and leftovers, you are not alone. More people now want a simple way to turn that kitchen waste compost into something useful instead of hauling it to the curb.
Kitchen composting does exactly that. It cuts trash, saves money on fertilizer, and feeds your plants with rich, living soil. This guide is for beginners who want a clear, no-fuss setup that works at home, even in a small apartment. If you want to know about fresh, practical indoor garden ideas, take a look at inside herb garden ideas.
What Is Kitchen Waste Compost and Why Should You Use It?
Kitchen waste compost is what you get when food scraps and other organic waste break down into dark, crumbly material that smells like fresh soil. Tiny microbes and worms do the work, as long as you give them the right mix of scraps, air, and moisture.
The payoff is big. Kitchen waste compost cuts how much garbage you send to the landfill, which means fewer smells from your trash can. Your plants grow better, because compost feeds the soil, not just the plant. You also spend less on store fertilizer, since your everyday scraps become a natural, slow-release plant food.
If you want a quick overview before you start, you can check this beginner’s guide to compost your kitchen waste, then come back here for a simple step-by-step plan.
Common types of kitchen waste you can compost
Most plant-based scraps work very well in kitchen waste compost. Good options include:
- Fruit and veggie peels, cores, and trimmings
- Coffee grounds and paper coffee filters
- Tea leaves and tea bags without plastic mesh
- Crushed eggshells
- Stale bread and plain pasta in small amounts
- Paper towels or napkins without grease or cleaners
- Shredded paper and cardboard without glossy ink
These materials break down fairly fast and add nutrients. Fruit and veggie scraps add nitrogen and moisture. Paper, cardboard, and napkins add carbon and help keep the pile fluffy.
Kitchen scraps you should keep out of your compost bin
Some foods cause trouble in small compost systems. Skip these in most home setups:
- Meat, fish, and bones
- Cheese and other dairy
- Oily or greasy foods
- Large amounts of cooked, salty, or saucy food
These can smell bad, attract rats or flies, and break down very slowly. Also, go easy on citrus peels and onions, especially in a small indoor bin. A little is fine, but a lot can make the compost too acidic and slow the process.
How To Start Kitchen Waste Compost At Home (Even In Small Spaces)
You do not need a big yard, fancy gear, or a lot of time. Start with a simple method that fits your space, then build the habit of saving scraps.
Choose the right compost method for your home
1. Outdoor compost pile or bin (yard owners)
If you have a yard, this is the easiest and cheapest method. You can:
- Make a simple open pile in a corner of the yard
- Use a basic plastic bin with air holes
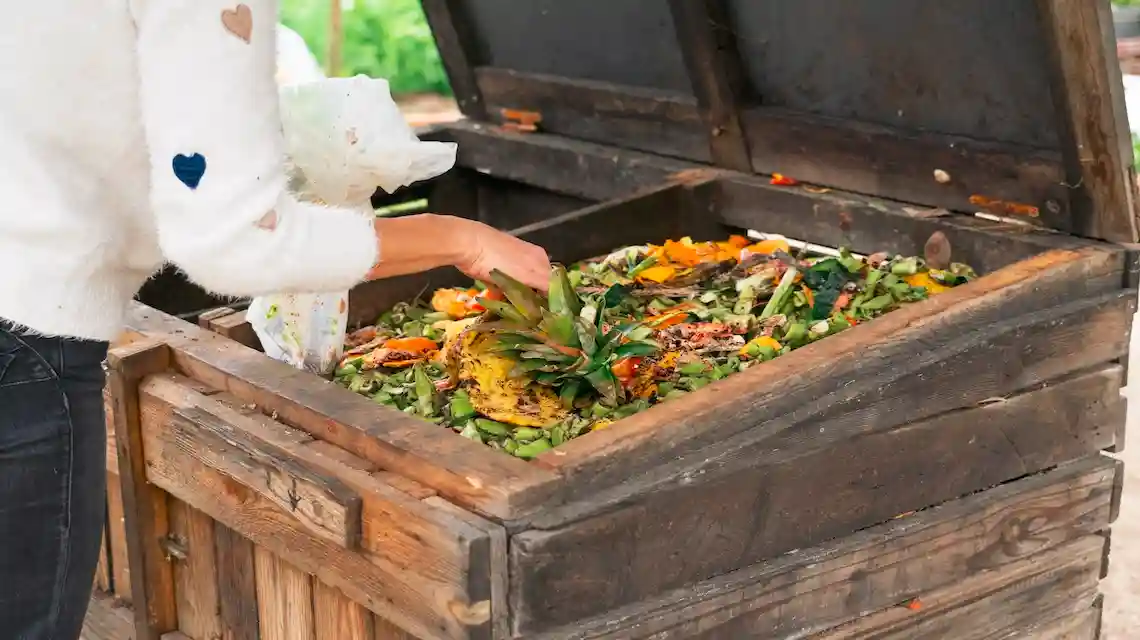
- Build a wooden compost box
Outdoor piles handle more scraps and some garden waste. They break down faster if you turn them now and then. The downside is they need a bit of space and can attract critters if you do not cover food scraps.
2. Closed compost bin or tumbler (balcony or patio)
A lidded bin or tumbler is great for a balcony, patio, or small yard. These units keep smells in and pests out. Tumblers are easy to turn, so you get compost faster. They cost more than a simple bin, but many people like the clean look and lower mess.
3. Indoor options (countertop plus drop-off or worms)
If you do not have outdoor space, you still have choices:
- Keep a countertop scrap bucket with a tight lid, then drop scraps at a community compost site or farmers market.
- Try a small worm bin, also called vermicompost, that fits under a sink or in a closet.
A worm bin gives you high-quality compost, but it needs steady care and the right moisture. A countertop bucket plus drop-off is the lowest effort if you have access to a local program.
Easy step-by-step guide to setting up your first compost
Once you choose a method, use this simple setup:
1. Pick a container
Use what matches your space: a plastic storage bin with holes, a store-bought compost bin, a tumbler or you can build your own compost container with wood. For a worm bin, follow a clear guide, like this home composting guide for gardeners.
2. Choose a spot
Place the bin on soil if possible, not bare concrete, so worms and microbes can move in. Pick a shaded or partly shaded spot outside. For indoor compost, choose a cool corner away from heaters and direct sun.
3. Add a base of dry brown material
Start with a 2 to 4 inch layer of:
- Shredded cardboard
- Shredded paper without heavy ink
- Dry leaves or straw
These “browns” add carbon and help air flow. They also keep the bottom from getting soggy.
4. Begin layering greens and browns
Your kitchen waste compost needs a balance:
- “Greens” add nitrogen and moisture. Think fresh food scraps and coffee grounds.
- “Browns” add carbon and structure. Think paper, dry leaves, cardboard.
Aim for about 1 part greens to 2 parts browns by volume. Each time you add a small bucket of scraps, cover it with a slightly larger layer of browns. This cuts smells and keeps flies away.
5. Cut scraps smaller when you can
Chop or tear big pieces into smaller ones. A banana peel left whole can sit for months. Chopped into pieces, it breaks down much faster.
6. Keep pests out
Always cover fresh food scraps with browns. Use a lid on indoor or balcony bins. If you see fruit flies, add more dry material on top and keep the lid closed.
7. Wait, stir, and watch
Your pile should feel like a wrung-out sponge, damp but not dripping. If it looks wet and slimy, add more dry browns. If it looks dusty and dry, add water with a spray bottle.
Stirring or turning the pile every week or two adds air and speeds things up. In warm weather, small batches of kitchen waste compost can finish in two to four months. Larger outdoor piles may take six months or more, which is still fine. Nature is patient.
Simple Tips To Keep Your Kitchen Waste Compost Smell-Free and Healthy
Most people quit composting because of smells or pests. The good news is that these problems are simple to fix with a few quick changes.
Fixing common kitchen compost problems fast
1. The compost smells bad
Rotten or sour smells usually mean too many wet greens and not enough air.
Quick fixes:
- Add a thick layer of dry browns on top.
- Stir or turn the pile to add air.
- Stop adding very wet food like old soup for a while.
2. The compost looks too wet or slimy
This feels like a soggy mess and breaks down slowly.
Quick fixes:
- Mix in shredded cardboard, paper towels, or dry leaves.
- Check that rain is not pouring into the bin, then move or cover it.
- Add fewer juicy fruits until it dries out.
3. The compost is dry and not breaking down
Dry piles slow to a crawl.
Quick fixes:
- Lightly sprinkle water while you stir.
- Add more fresh kitchen scraps or coffee grounds.
- Cover with a lid or tarp to hold moisture.
4. You see fruit flies or other pests
Fruit flies usually show up when scraps sit exposed on top.
Quick fixes:
- Always bury fresh scraps under browns.
- Keep a lid on your bin or use a fine mesh cover.
- Store very sweet scraps in the freezer, then add them right before you cover and close the bin.
Most issues with kitchen waste compost are signs that you are learning, not that you failed. Small tweaks go a long way.
Conclusion
Kitchen waste compost turns everyday scraps into free plant food, cuts trash, and gives you healthier soil. You only need a simple bin, a mix of greens and browns, and a bit of attention to moisture and air.
Start small this week. Set a countertop bucket for scraps, pick a bin or community drop-off, and begin feeding your future garden one banana peel at a time. Your plants, your wallet, and the planet will all feel the difference.
Simple, Practical FAQs About Kitchen Waste Compost
What is kitchen waste compost?
Kitchen waste compost is decomposed food scraps that turn into a dark, crumbly material rich in nutrients. Microorganisms, worms, and insects break down leftover fruit, vegetables, coffee grounds, and other organic scraps. With the right mix of materials, air, and moisture, your kitchen waste becomes free plant food instead of trash.
What kitchen scraps can I compost, and what should I avoid?
Most plant-based scraps are safe to compost. That includes:
- Fruit and vegetable peels, cores, and trimmings
- Coffee grounds and paper filters
- Tea leaves and paper tea bags (no plastic mesh)
- Crushed eggshells
- Stale bread, rice, and plain pasta in small amounts
Avoid meat, fish, greasy foods, large amounts of dairy, and anything moldy or rotten. Skip glossy or plastic-coated paper, pet waste, and any food packaging.
Will kitchen compost smell or attract pests?
Healthy compost smells earthy, not rotten. Bad odors usually mean there is too much wet, green material (like food scraps) and not enough dry, brown material (like leaves or shredded paper).
To keep smells and pests down:
- Cover fresh scraps with browns right away
- Keep a lid on your kitchen caddy or countertop bin
- Avoid meat, bones, and oily foods
- Empty indoor containers into your main bin often
If flies or smells show up, add more dry material and give the pile some air.
Do I need a special bin for kitchen waste compost?
You do not need a fancy bin, but a good setup makes composting easier. Many people use a small lidded container or countertop caddy indoors, then empty it into a larger outdoor bin or tumbler.
If you live in an apartment, a sealed bokashi bucket or a worm bin (vermicompost) can work well indoors. The key is a container that is easy to clean, limits odor, and keeps pests out.
How long does kitchen waste take to turn into compost?
With good conditions, kitchen scraps can turn into finished compost in about 2 to 6 months. A smaller, well-aerated, and regularly turned pile breaks down faster.
If the pile is cold, dry, or rarely mixed, it can take closer to a year. You will know it is ready when the compost looks dark, crumbly, and smells like soil, and you can no longer recognize the original food scraps.
How do I use finished kitchen compost in my garden or pots?
You can mix finished compost into garden beds, potting soil, or use it as a light mulch. For outdoor beds, spread 1 to 3 inches on top, then gently work it into the top few inches of soil.
For containers, blend about one part compost with three parts potting mix. Avoid using pure compost for pot-grown plants, since it can hold too much water and lacks structure on its own.
Can I compost citrus peels, onion skins, and garlic?
Yes, you can compost citrus, onion, and garlic scraps in a regular outdoor bin. They break down more slowly, so cutting them into smaller pieces helps.
Worm bins are a bit more sensitive, so it is best to add only small amounts of citrus and alliums at a time. If you notice your worms clustering away from these scraps, cut back for a while.
Is kitchen compost safe for vegetable gardens?
Properly finished kitchen compost is safe and very helpful for vegetable beds. It adds nutrients, improves soil structure, and helps the soil hold water.
Just make sure everything is fully broken down, especially if you used any cooked food or bread. When in doubt, let it sit and mature a bit longer before you spread it around food crops.
 Backyard Decor Ideas
  Healthy Living Through Sustainable Gardening Ideas
  What to Fill a Raised Garden Bed With
  Inside Herb Garden Ideas for Small Kitchens
  How to Keep Cats Out of a Flower Garden